-
Written By Priyanka Kumari
-
Updated on December 19th, 2024
Free Ways to Convert OLM Files to PST Format
Summary: Accessing Mac Outlook emails from Windows requires converting OLM to PST. Microsoft designed Outlook for both platforms since Mac and Windows have similar user interfaces and functionality. In Outlook for Windows, data is saved in PST files (OST files when connected to Exchange). However, Outlook for Mac PC does create an OLM file and stores users’ Outlook emails in OLM files. In this article, we are going to learn how to convert OLM files to PST format in two different methods. The first method is the manual approach and the second method is the use of the Automated solution OLM Converter.
Different Ways to Convert OLM Files to PST
There are various ways to perform the OLM file conversion. Here we are going to learn two of the most commonly used methods to export OLM to PST.
Method 1: Manual Conversion
Manual conversion is a bit tricky and should not be used until and unless you completely understand the procedure. This procedure, if done improperly, might even corrupt your OLM file. This procedure to convert OLM files to PST can be done in the following steps:
- Setting up an IMAP account mail,
- Set up Outlook for Mac with your IMAP mail account and
- Transferring your emails from your Outlook mail account to your IMAP mail account.
- Synchronize the IMAP account with Windows MS Outlook and copy the emails.
Setting up an IMAP Account
To set up an IMAP Gmail account, follow the procedure:
- Create a new Gmail account.
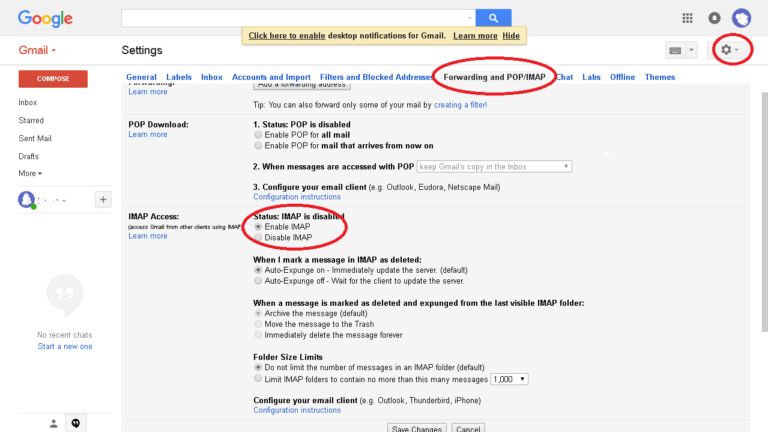
- Go to Settings, i.e. click on the “Gears” icon and select “Settings”.
- Click onForwarding and POP/IMAP.
- Enable IMAP Access.
- Google may block by default third-party mail clients like e.g. Outlook. To Enable Third-Party Mail Clients, you may enable “Less secure apps” (third-party mail clients) from My Account>Sign-in & security>Connected apps & sites>“Allow less secure apps.
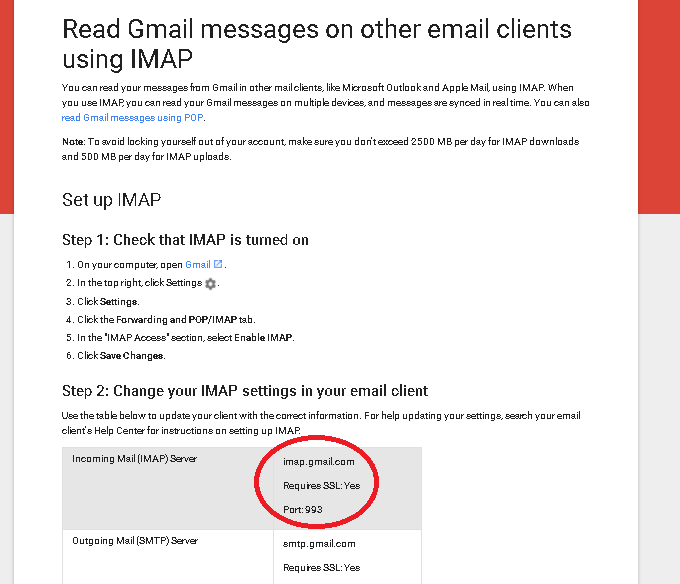
- Enter the following information in the IMAP account settings of your mail client:
- Server:gmail.com
- Encryption/Authentication:SSL
- Port:993
- Username: Your Gmail email address
- Password: Your account password
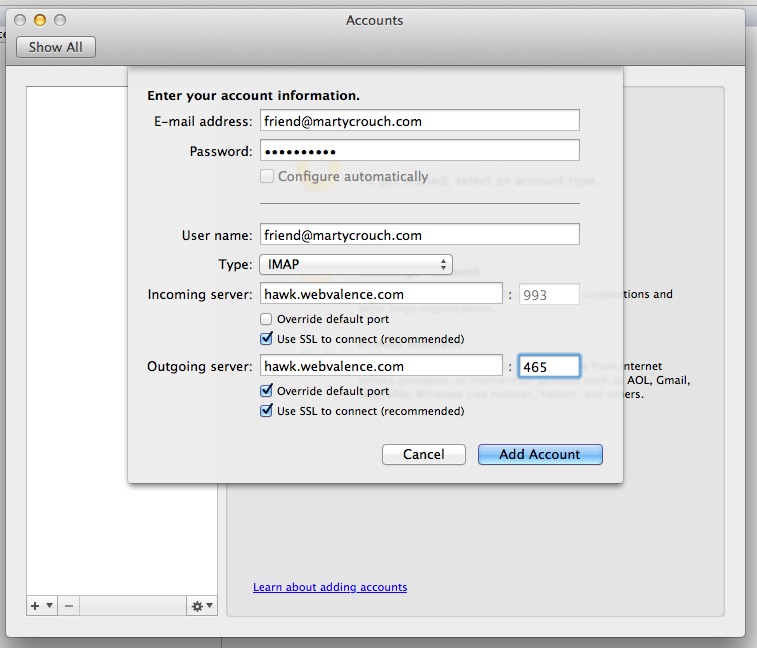
Set up Outlook for Mac With Your IMAP Mail Account
Follow the procedure mentioned below to Set up Outlook for Mac with the IMAP mail account you created in order to convert OLM files to PST.
- Open Outlook for Mac.
- If this is the first account you’re adding, follow the prompts. Otherwise, go to step 3.
- SelectTools>Accounts.
- Click the plus (+) sign >New Account.
- Enter the email address of the account.
- Follow the prompts to complete the account setup.
Transferring Emails From Outlook Mail Account to IMAP Mail Account
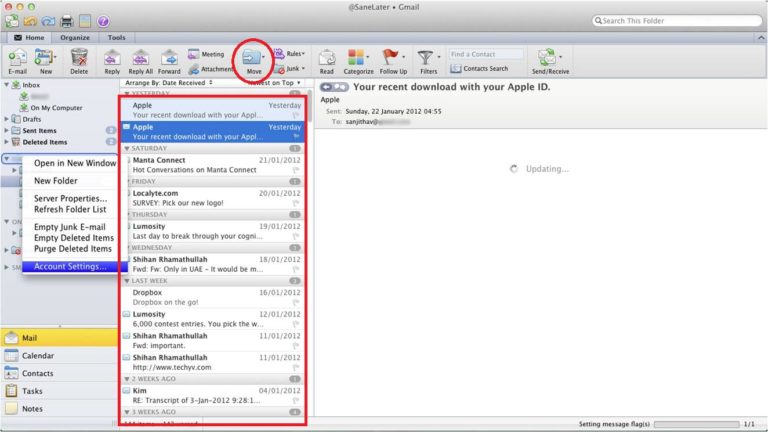
Now that you have set up your Outlook for Mac with the IMAP account, now you need to transfer your emails from your Outlook account to the IMAP account. Follow the steps mentioned below for the same:
- OpenOutlook for Mac.
- Right-click any mailbox item that you want to move. ClickMove>Copy to Folder.
- Now type the name of your IMAP folder and clickCopy.
- After copying the selected mailbox data to the IMAP mailbox, you need to click Send/Receive button to update your Outlook for Mac IMAP folder.
Synchronize IMAP Account With Windows MS Outlook
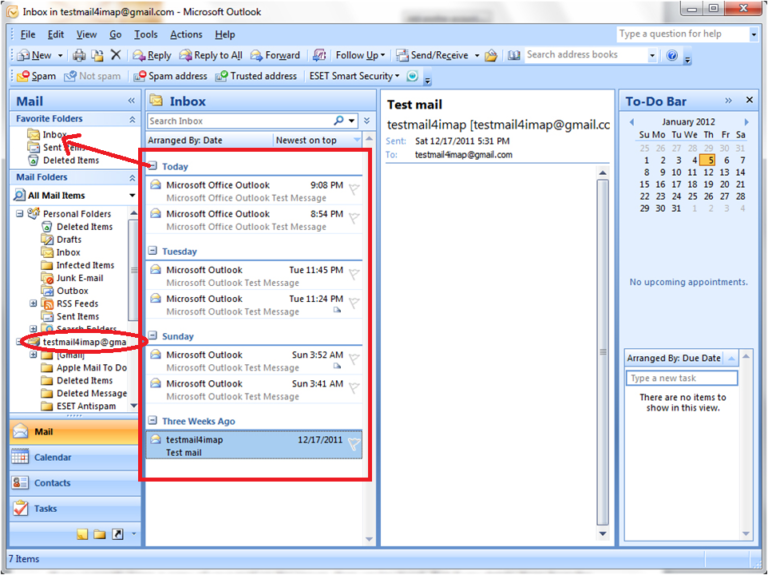
The final step of the procedure is to synchronize your Outlook client on Windows PC with the same IMAP account you created in Gmail.
- Set up the same Gmail IMAP account you created on your Windows Outlook client.
- Move the emails from the IMAP account to your Windows Outlook Inbox Folder by dragging and dropping.
Method 2: Use Professional Solution to Convert Outlook OLM to PST
The procedure to convert OLM files to PST format by the manual procedure is so complicated and requires sound technical knowledge. That’s why I suggest you to go with the Professional solution OLM Converter tool to convert OLM to MBOX, PST, PDF, EML, CSV, TXT, and DOC file formats. Follow the mentioned steps to import the olm file to windows outlook.
- Launch OLM Converter of MailConverterTools on your system and run as an administrator. C
- Now, choose the single file/ Multiple files option to browse the OLM file.
- After selecting the OLM file, click the Ok button for further proceedings.
- The selected files or folders will show up on the screen in the tree-like structure. Select the files or folders which you want to convert.
- You can also preview the mail and their attachments files. Click the Next button to continue the process.
- Select the file format/ email client in which you want to convert the OLM file.
- The tool provides you with various advanced features such as removing duplicate emails, maintaining folders hierarchy, task filter, mail filter, etc., choose the option according to your preference.
- Choose the path to save option to assign a path to the resultant output.
- At last, click on the convert button to start the conversion process.
- You can also download the report of the working process by clicking on the download report option.
By following these steps, you can easily convert OLM to Outlook PST with 100% accuracy. Additionally, you can utilize this tool to open OLM file on mac without Outlook.
Conclusion
Here in this blog, we have provided the two best ways to convert OLM files to PST. All the steps of the manual approach are provided in the detail. However, if the manual approach does not provide satisfactory results, you can go for the Third-party app solution OLM Converter tool.
About The Author:
Priyanka Kumari is a technical content writer in the fields of Email Migration, Data Recovery, Cloud Migration, and File Management. She is dedicated to simplifying complex technology terminologies for all users. Her articles and guides demonstrate her commitment to streamlining email management for professionals or businesses of any size.
Related Post
