-
Written By Priyanka Kumari
-
Updated on April 10th, 2025
Best Ways To Export Office 365 Mailbox to PST File in 2025
Summary: In this write-up, you will find the two effective ways to export email from Office 365. This article will help you to export Office 365 mailbox to PST by using the eDiscovery method. Additionally, it will introduce you to an automated Office 365 Backup Tool to accomplish this task.
Office 365 is a cloud-based service that combines several Microsoft applications enabled over the cloud. It allows users to access their files remotely as long as there’s an internet connection. However, Microsoft Office 365 doesn’t provide the option to backup mailbox data. Therefore, many Office 365 users have this query of how to export Office 365 email to PST.
On the other hand, Microsoft Outlook is a popular email client that uses PST files to store contacts, calendar items, emails, and tasks. It also facilitates working offline and stores your data on the exchange server in OST file format. Apart from this, you can encrypt the PST files to protect the confidentiality of your file data.
Also read: How to export Office 365 to MBOX using the best solutions?
Why Do We Need To Backup Office 365 Mailbox To PST?
Many reasons induce the demand to export Office 365 mailbox to PST. Let’s go through some of those reasons:
- If you do not have a strong internet connection, you can’t access the Office 365 mailbox data.
- Office 365 provides fewer functionalities as compared with MS Outlook.
- Most users use Office 365 for emails, storage, and access to some Office 365 programs. It’s only about 20% of what the Office 365 suite offers to its users.
- Microsoft doesn’t provide any built-in feature to backup Office 365 mailbox data.
- You can reduce the size of the Office 365 mailboxes by using a method to export the Office 365 mailbox to PST.
Sometimes, while accessing the Office 365 shared mailbox through Outlook, some errors may occur. You can refer here to fix the Office 365 shared mailbox not showing in Outlook error.
Export Office 365 Mailbox to PST By Using eDiscovery
eDiscovery is an integrated feature into the Office 365 Security and Compliance Center. Most of the users use the eDiscovery procedure as an alternative to backup Office 365 mailbox to PST. Generally, it is a lengthy process and requires extra attention to perform the whole process. Here, we divide the entire process into three phases.
- Assign the eDiscovery permission and check for the Export role.
- Create and Run a new Content Search.
- Backup Office 365 Mailbox to PST using eDiscovery.
Step: 1 Assign eDiscovery Permission And Check For The Assigned Roles
In the first phase, you have to assign some eDiscovery related permission and check for the export role. Follow the steps below to perform this task.
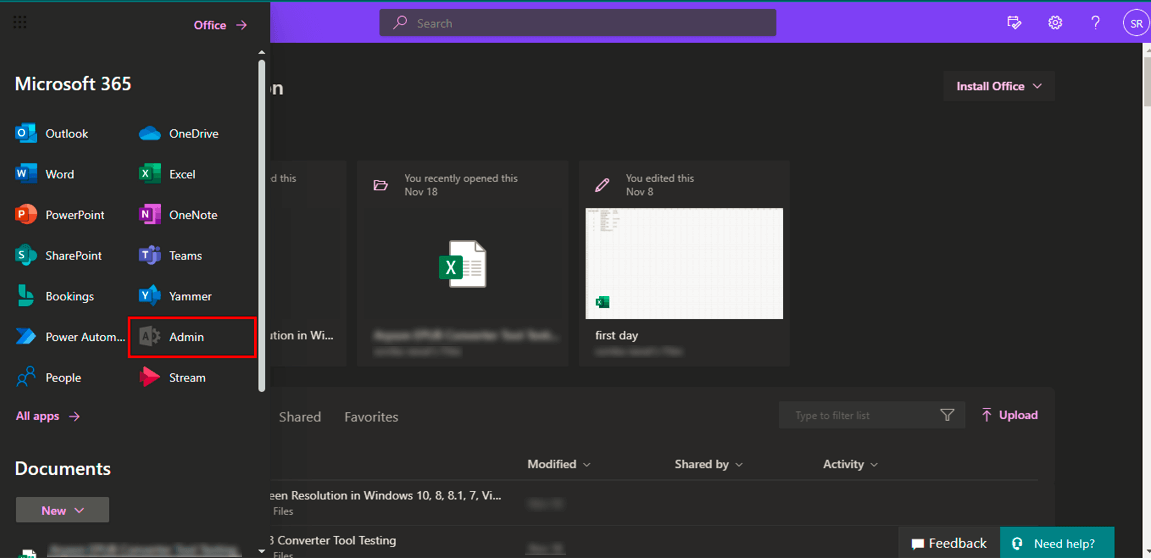
- Log in to your Office 365 account and select Admin to launch Microsoft 365 Admin Center.
- Now, from the Admin Centers, click on the Compliance option.
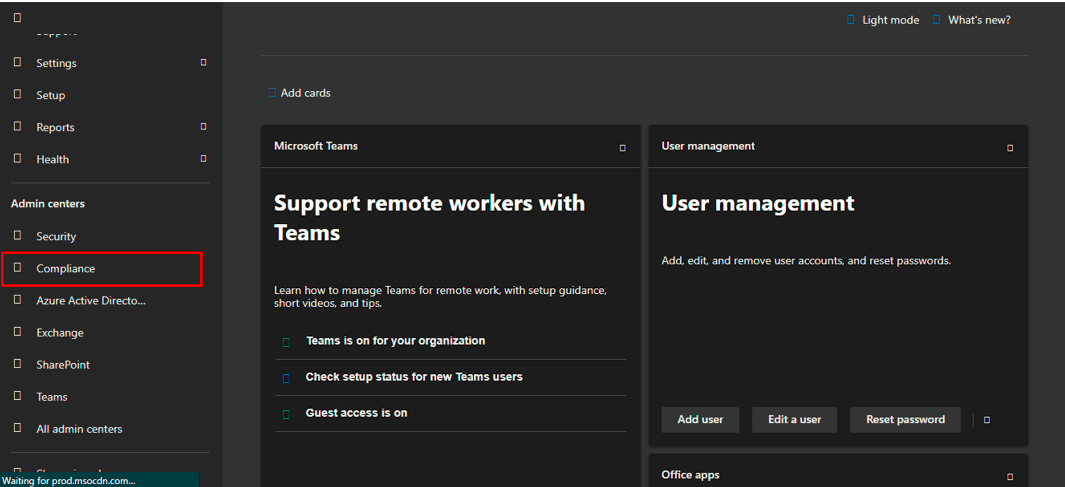
- A new Microsoft 365 compliance wizard will open.
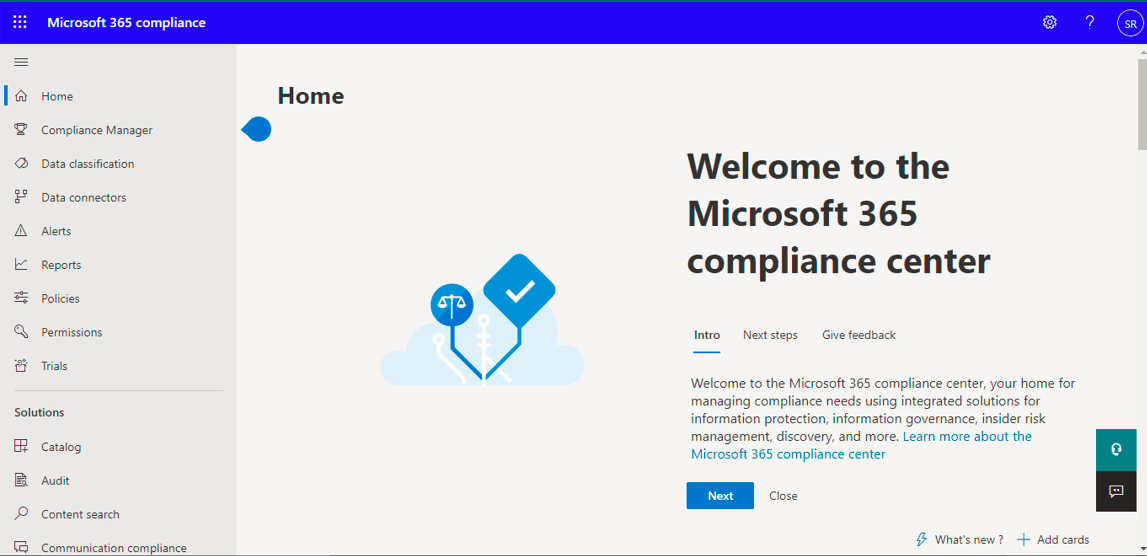
- Click on the Permissions option and then select Roles to view and manage the assigned roles.
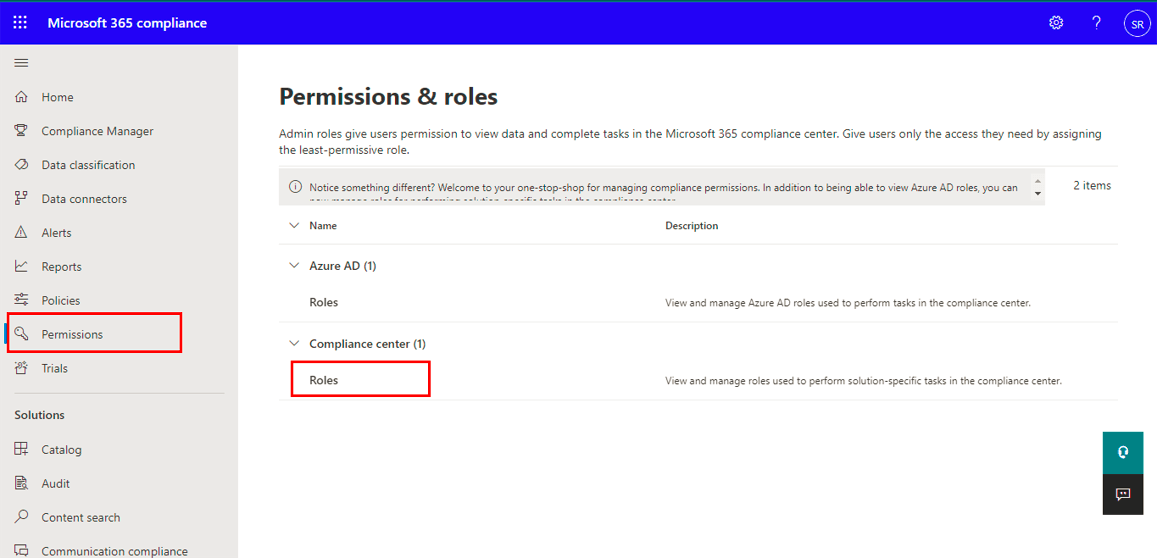
- Search for eDiscovery Manager and check the box beside it.
- Now, the eDiscovery Manager Wizard opens. Click on the Edit Role Groups to assign roles that are required.
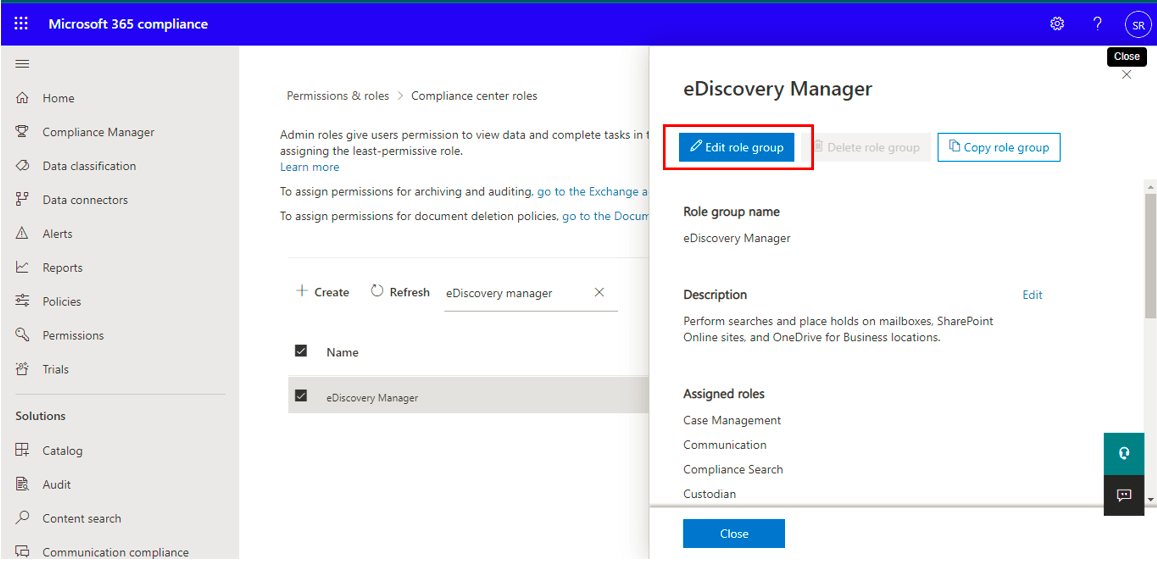
- Generally, this Role Group is assigned for Case Management, Compliance Search, Export, Hold, Preview, Review, and RMS Decrypt.
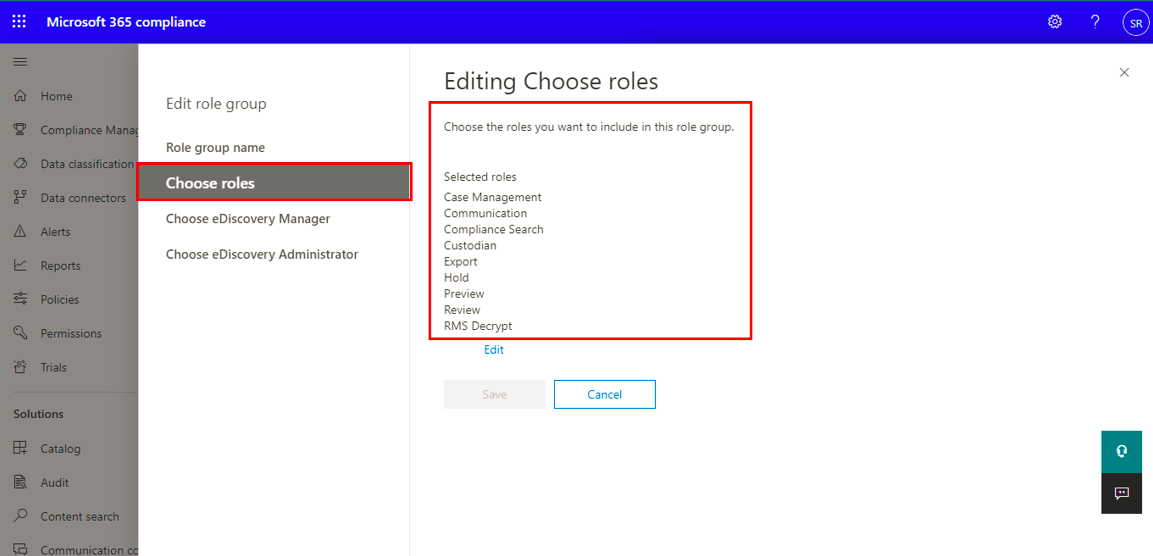
- If the Export Role is not assigned, click on the Edit Role Group, and add Export Role from Choose Roles option.
Step: 2 Create and Run A New Content Search
After assigning the eDiscovery permission and checking for the assigned export role, you need to create a new content search. To perform this action, follow the steps given below.
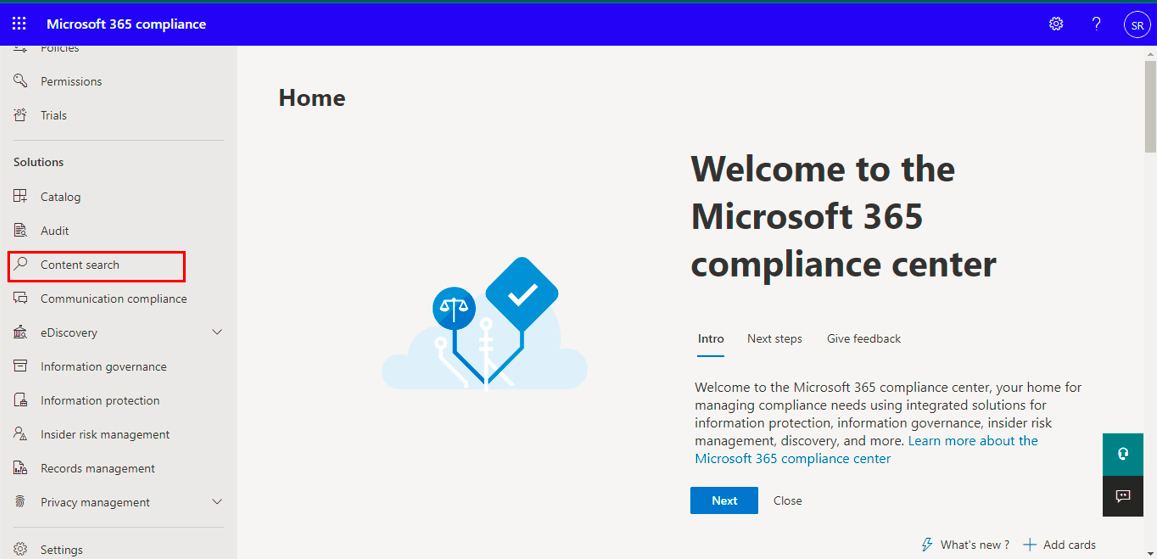
- Visit the Microsoft 365 Compliance Center and drag it down to select the Content Search.
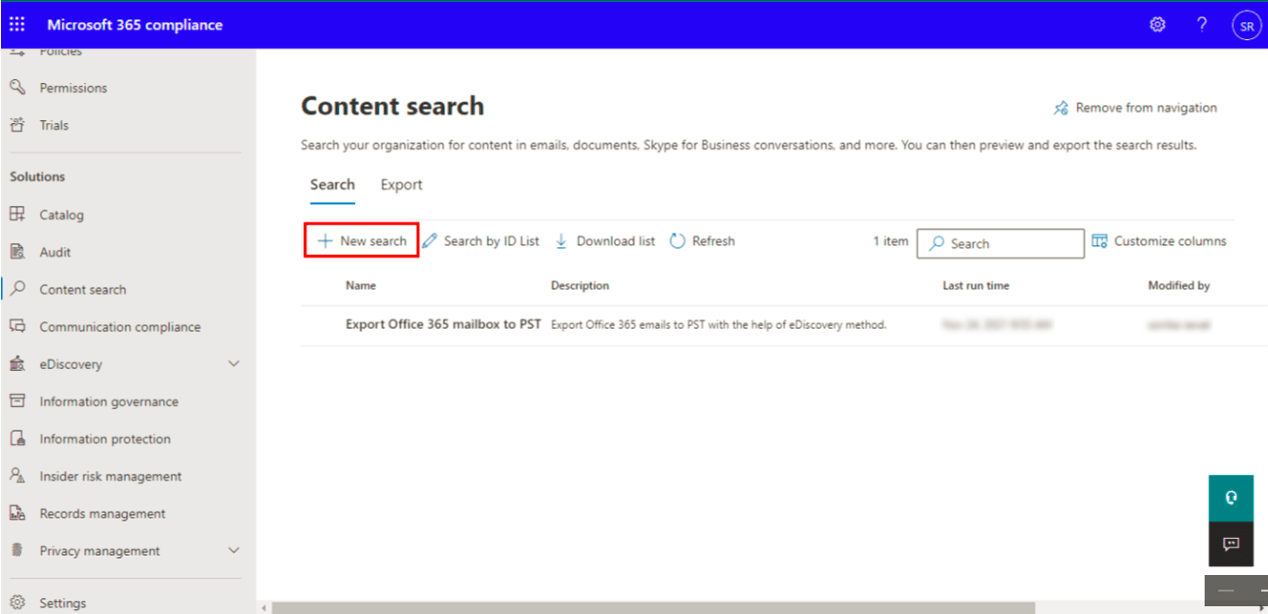
- Now, the Content Search wizard is open. Click on the New Search.
- Provide the Name and Description to create a search query. Then, select the Next option.
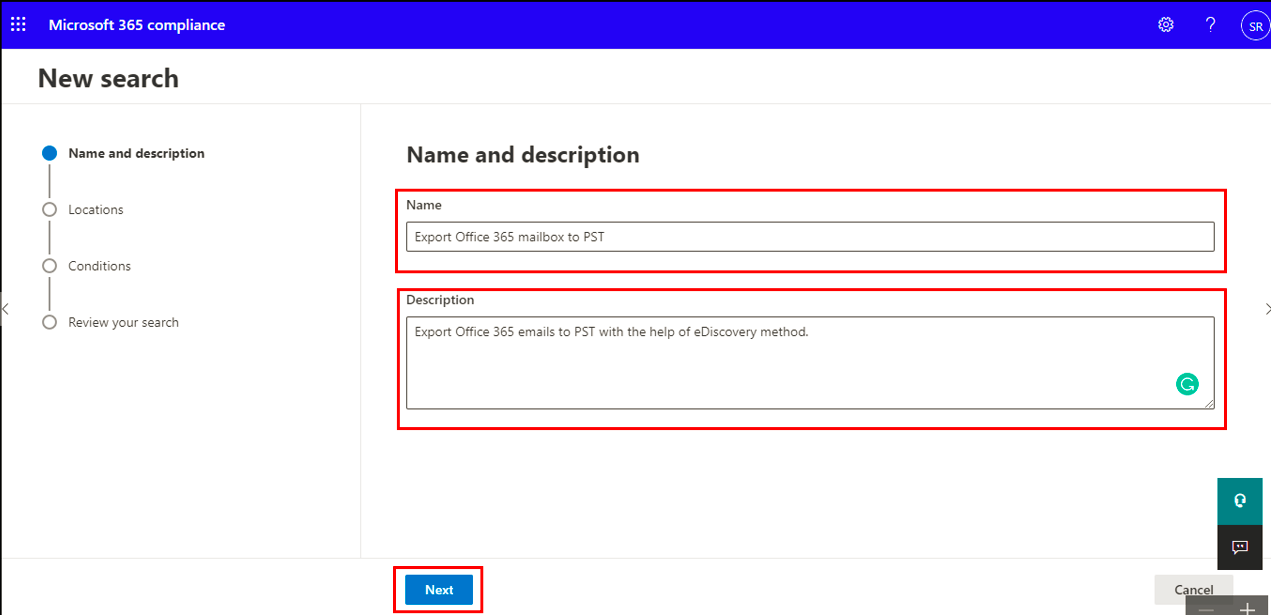
- Under the Location Wizard, turn on the status of Exchange Mailboxes and click on the Next button.
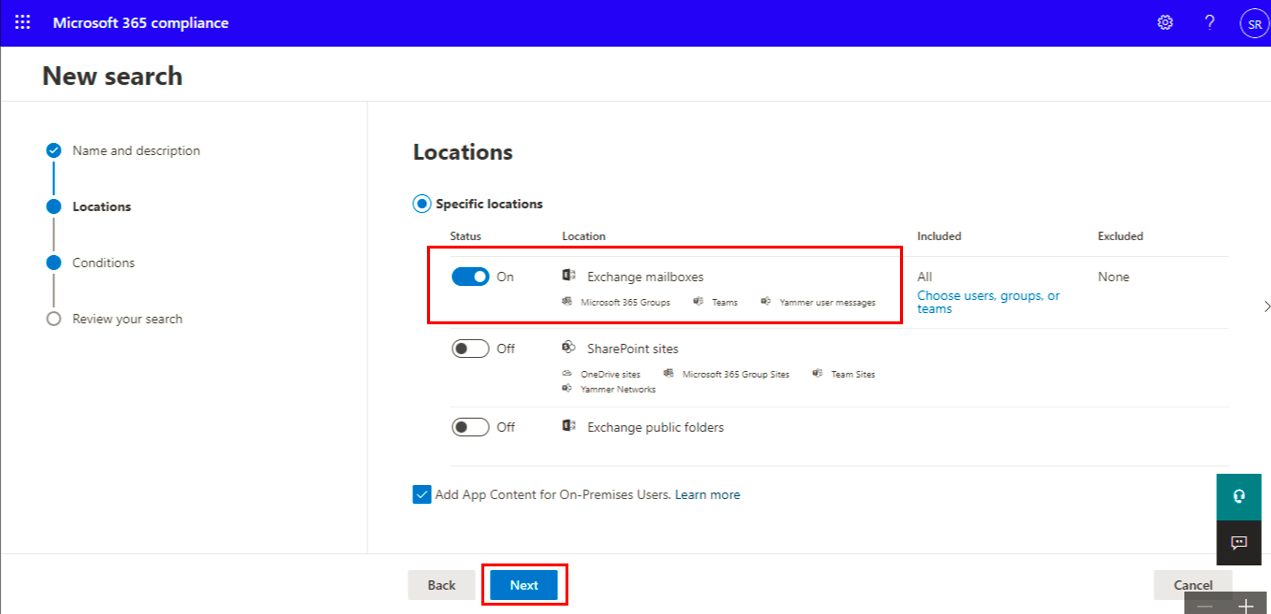
- Now, the Define your Search Conditions panel is open. Here, you can Add Conditions according to your preference. After assigning the condition, click on the Next button.
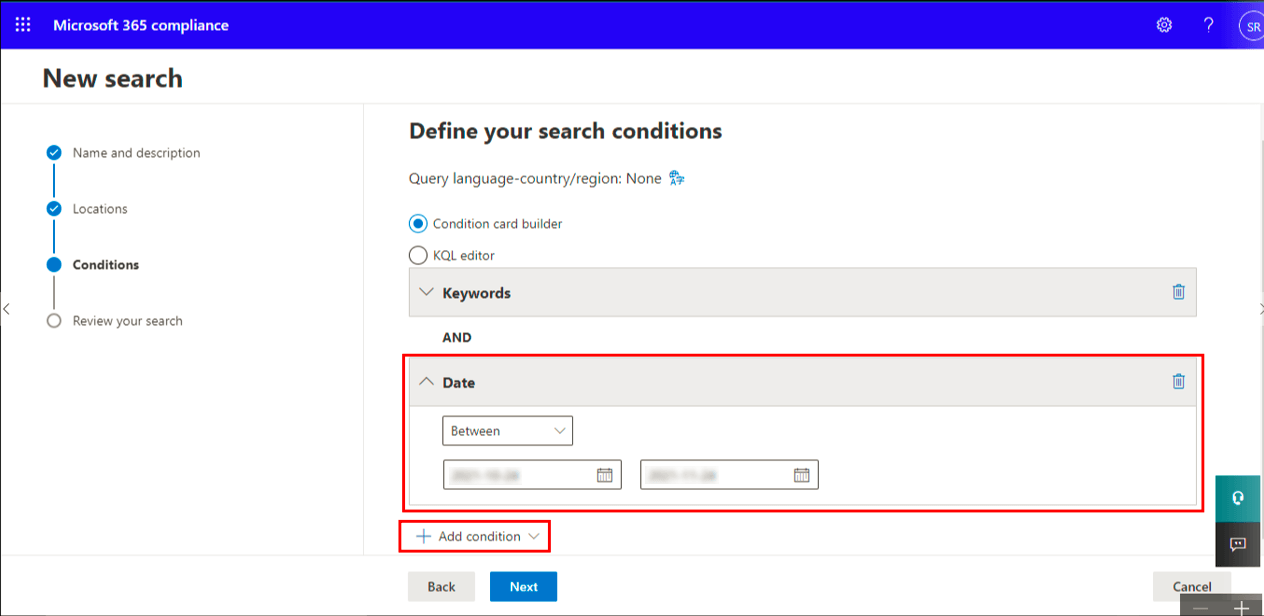
- In the end, it will show the preview of your Content Search. After review, your search, click on the Submit button to create a new Content Search.
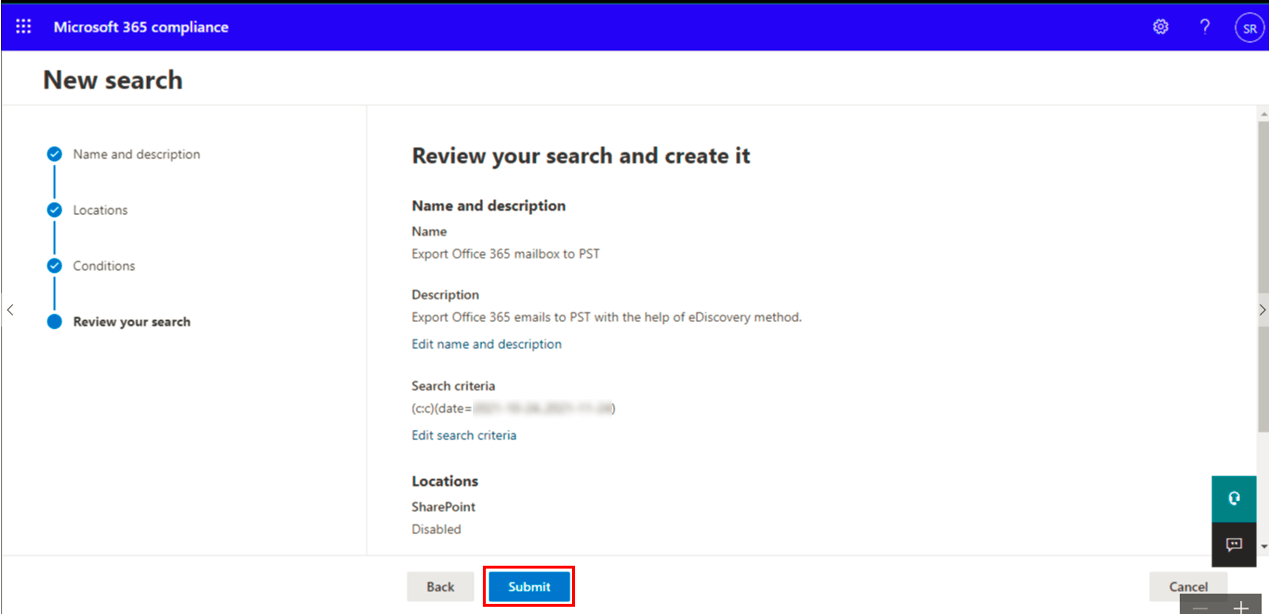
- You have successfully created a New Search. Click on the Done option to finish this process.
Step: 3 Export Office 365 Emails To PST Using eDiscovery
After successfully creating a New Content Search, Now you can export office 365 mailbox to PST. You should carefully execute the following steps to accomplish this task.
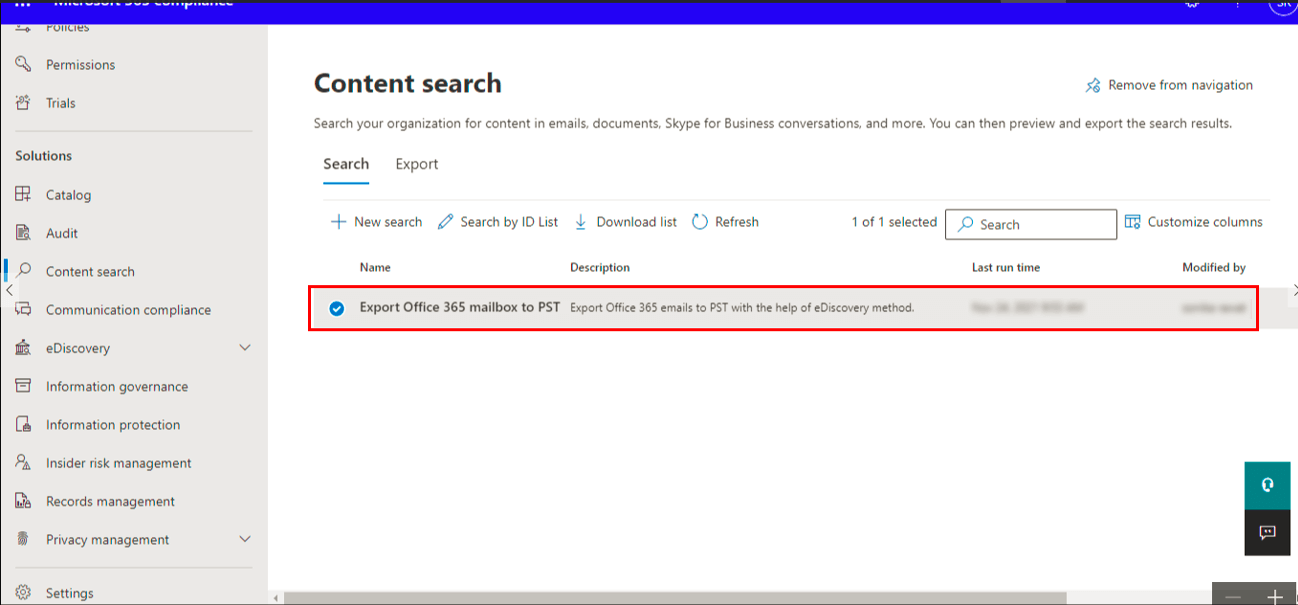
- Select the Content Search that you have created in the above process.
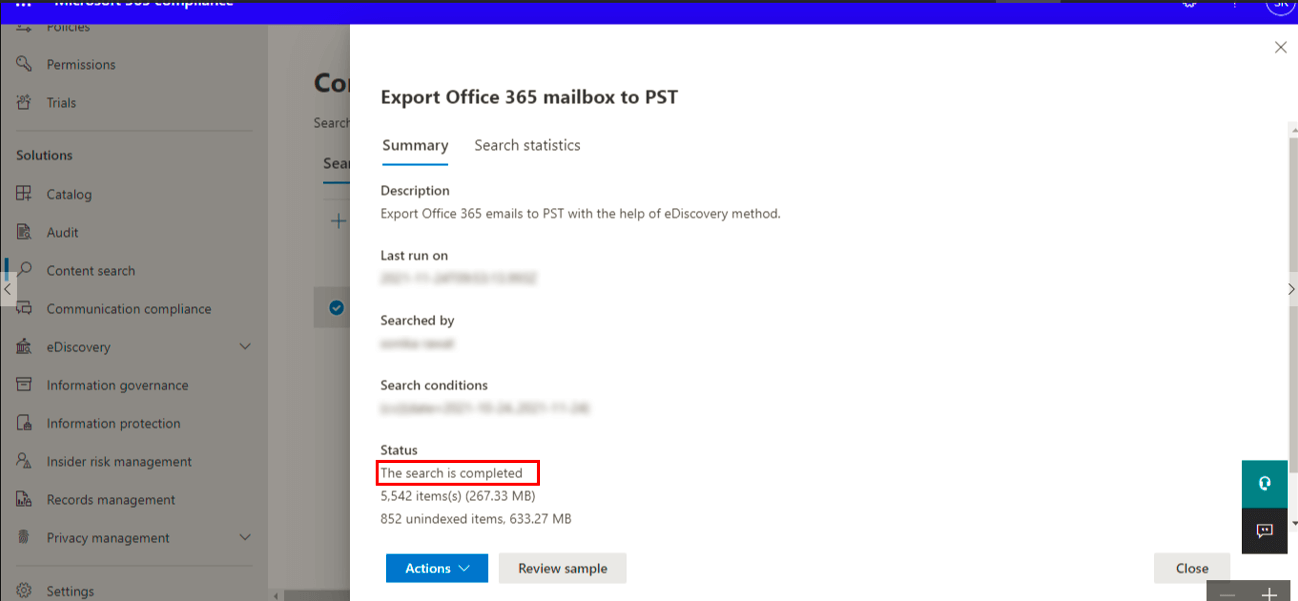
- It will show the Summary, where you will find the search is completed under the Status panel.
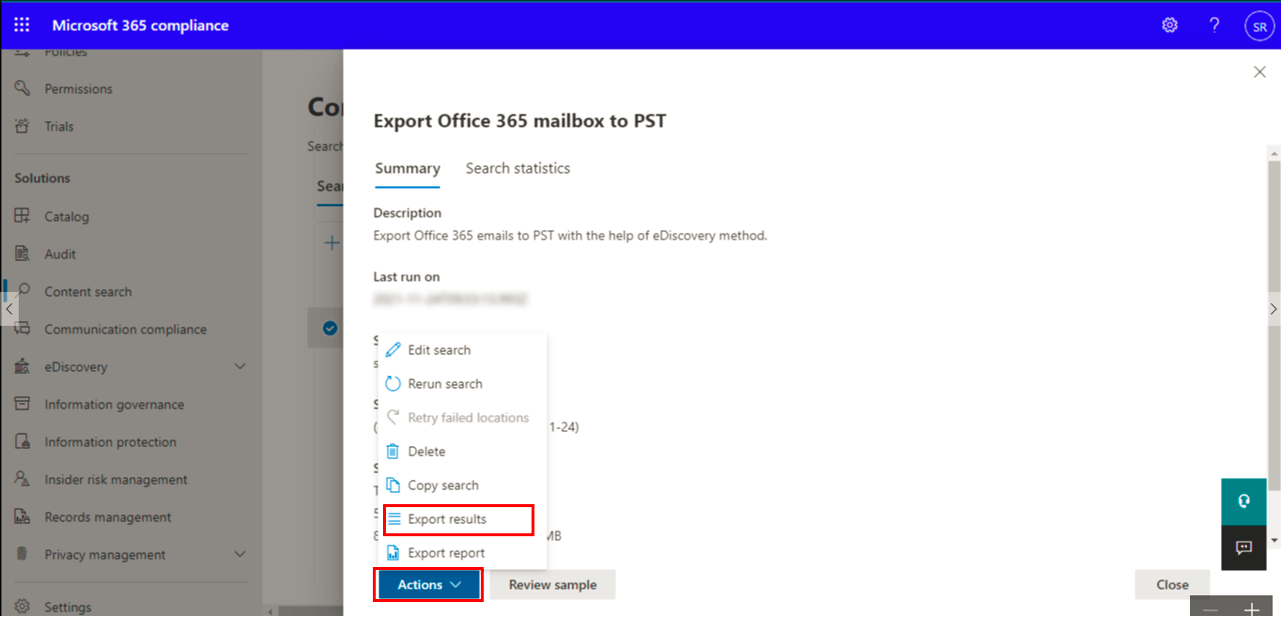
- Now, click on the Action button and select Export Result.
- In the Export Result wizard, choose the Output and Export Exchange Content As options.
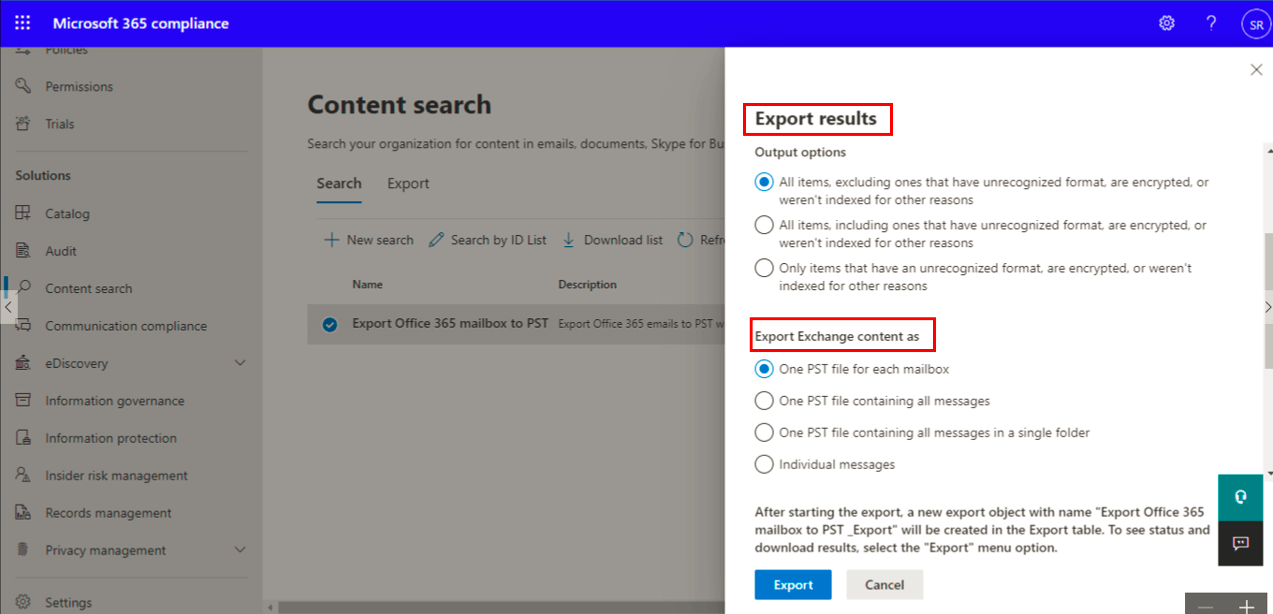
Note: “There is an option to enable Deduplication. If you enable this option, then it will keep out the duplicate data during the content export process.”
- Then click on the Export button to proceed further.

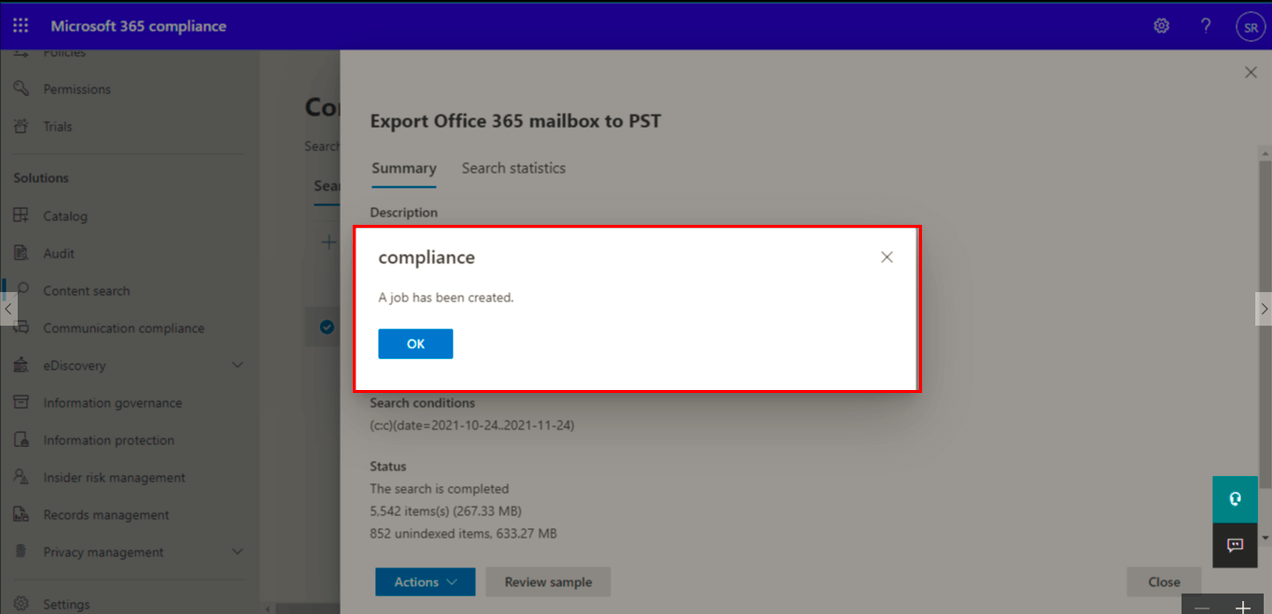
- Now, a job has been created. Then, press Ok.
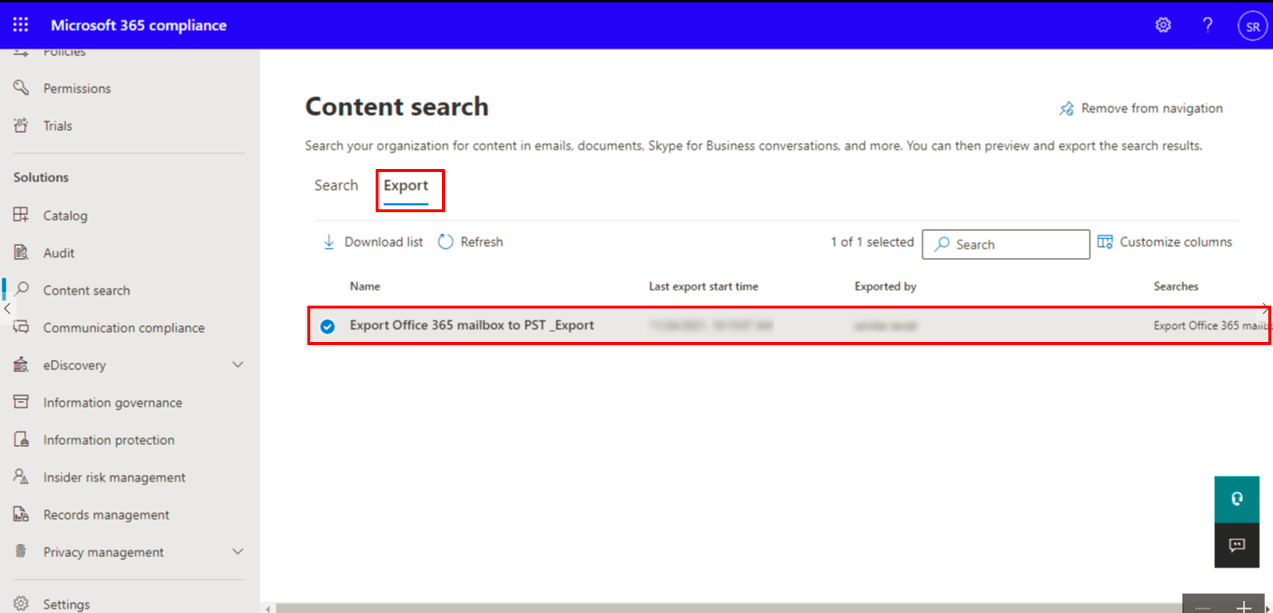
- It will take you to the Content Search panel. Now, select the Export option and click on the Content Search that you have created.
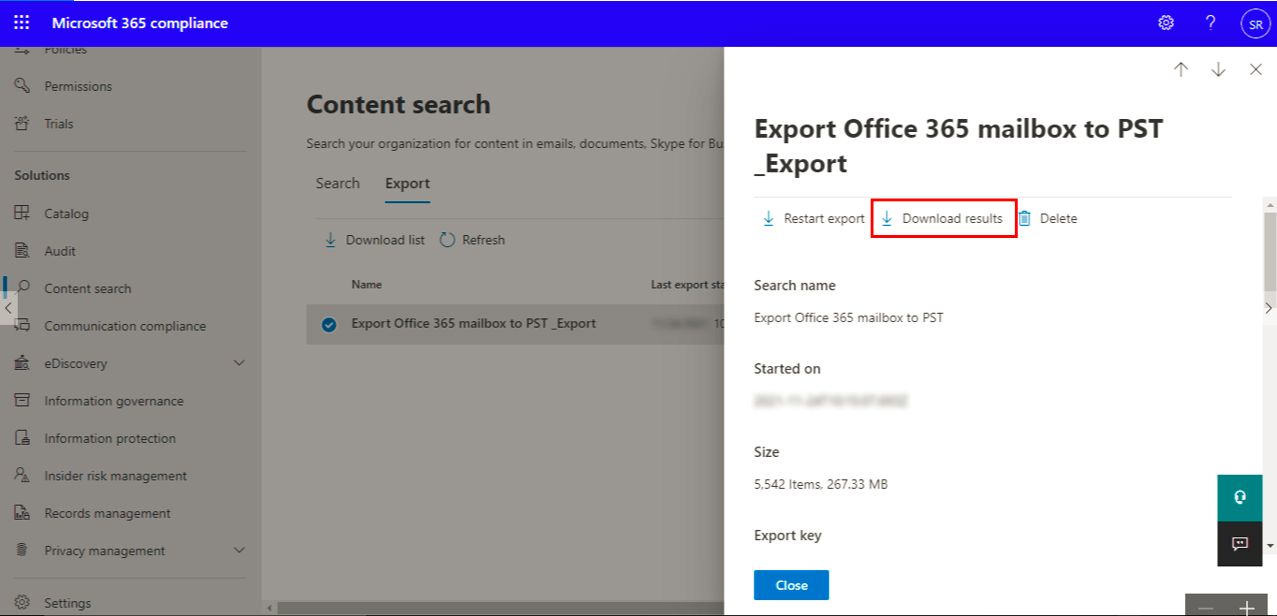
- In the display panel, hit on the Download Result option.
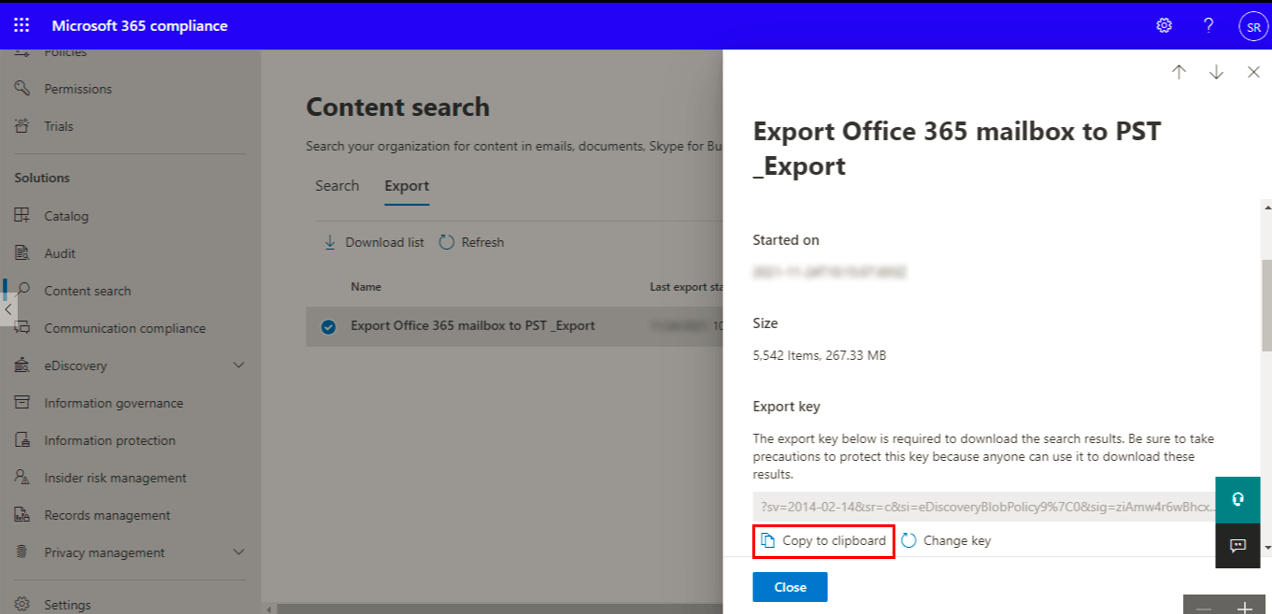
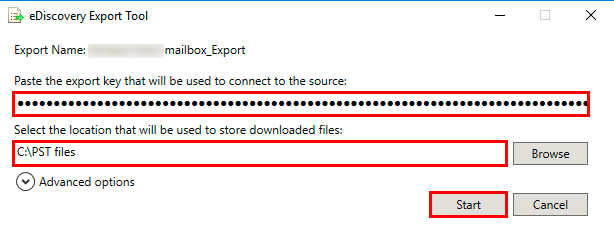
- Now, Copy the Export Key to the clipboard and then install the Microsoft Office Export Tool.
- Paste the Export Key and select the location for the resultant PST files. Now click on the Start button.
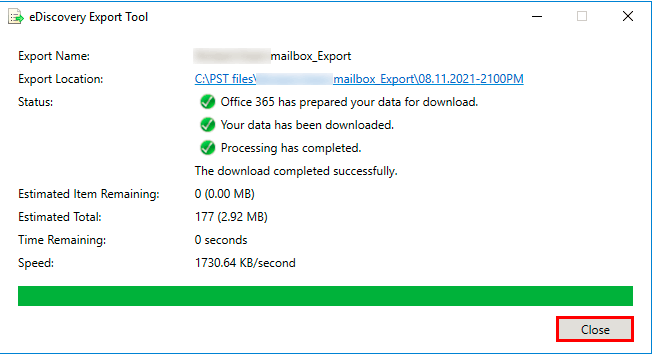
- In the end, a wizard opens that will display the successful completion of the whole process.
However, to export Office 365 mailbox to PST using eDiscovery is a lengthy process. Some obstacles arise while exporting Office 365 mailbox to PST. Hence, you can export PST from Office 365 webmail by using professional software.
Professional Approach to Export Email From Office 365 To PST
You can opt for a reliable Office 365 Backup Tool to backup and migrate Office 365 mailbox data. It will also allow you to restore multiple OST/PST files to the Office 365 mailbox.
Following are the detailed step-by-step working of this Office 365 Email Backup Solution.
- Download and Launch Office 365 Email Backup Tool.
- Select Backup and then proceed to enter the credentials of Office 365 Account.
- Check the Assign Impersonation rights to view and backup the sub-user accounts.
- After Signing in, click on the Import CSV option.
- Select the backup option from Mailbox, In-place archive, and Public folder.
- Now, click on the Next button to preview your selection.
- Select the folders that you want to backup and click on the Next button.
- Choose the PST format from the dropdown of the Save/Backup/Migrate As option.
- Select the options from Remove duplicate emails, Mail filter, and Task filter as per your requirements.
- Provide Custom Folder Name, Naming Convention, and Path to save and press Next button.
- You can Download Report after the process completion.
Conclusion
After going through this article, you can export Office 365 mailbox to PST using the eDiscovery method. Additionally, this article provides the detailed stepwise working of the Office 365 backup tool to ensure high data integrity. You can opt for any solution according to your convenience.
About The Author:
Priyanka Kumari is a technical content writer in the fields of Email Migration, Data Recovery, Cloud Migration, and File Management. She is dedicated to simplifying complex technology terminologies for all users. Her articles and guides demonstrate her commitment to streamlining email management for professionals or businesses of any size.
Related Post
